 English
 Español
Content
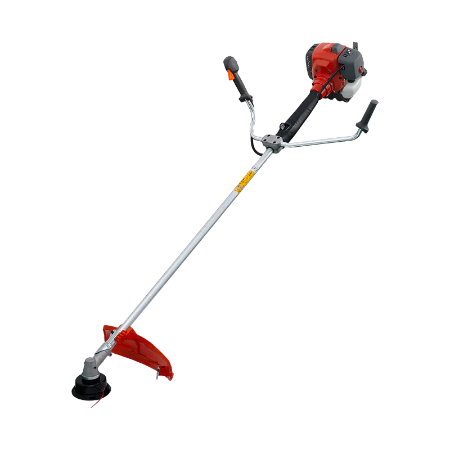
Understanding the Side Pack Brush Cutter Design
For professionals and serious land management enthusiasts, the tool's design is paramount to its effectiveness and user experience. The side pack brush cutter, characterized by its unique engine and drive shaft configuration, offers a distinct set of advantages for tackling dense overgrowth and tough vegetation.
What Defines a Side Pack Configuration?
Unlike traditional straight-shaft or loop-handle brush cutters, the side pack model features a design where the engine is mounted perpendicularly to the drive shaft. This configuration shifts the engine's weight to the operator's side, rather than it being directly behind the shaft. This fundamental design difference impacts everything from weight distribution and maneuverability to the types of tasks the tool excels in. The engine's placement allows for a more balanced feel during operation, especially when using heavier cutting attachments, reducing overall user fatigue during extended periods of work. This design is not merely an aesthetic choice; it is an engineering solution aimed at improving control and power delivery in challenging environments.
Key Components and Their Functions
To fully appreciate the capabilities of a side pack brush cutter, one must understand its core components. Each part plays a critical role in the tool's overall performance and durability.
- Engine: Typically a two-stroke or four-stroke gasoline engine, it provides the power necessary for demanding cutting tasks. The side pack design often accommodates slightly larger engines, offering greater horsepower and torque for cutting through thick brush and small trees.
- Drive Shaft: This is a rigid or flexible shaft enclosed in a tube that transmits power from the engine to the cutting head. The length and construction of the shaft are crucial for maneuverability and power loss prevention.
- Gearbox: Located at the end of the shaft, the gearbox converts the high-speed, low-torque rotation from the shaft into lower-speed, high-torque rotation needed for the cutting attachment. Its quality determines the efficiency of power transfer and its resilience to impact.
- Cutting Attachments: A wide variety exists, including metal blades for heavy-duty clearing, plastic trimmer lines for lighter grass, and circular saw blades for forestry work. The power of the side pack design allows for the use of larger, more aggressive attachments.
- Harness System: Arguably as important as the cutter itself, a well-designed harness distributes the tool's weight across the shoulders and hips, making it possible to operate the powerful machine for hours with minimal strain.
Understanding these components allows users to make informed decisions about maintenance, attachment compatibility, and ultimately, which model is best suited for their specific land management needs.
best side pack brush cutter for heavy duty clearing
When the task at hand involves more than just trimming weeds and extends to clearing dense thickets, saplings, and overgrown fields, only a heavy-duty brush cutter will suffice. Identifying the best side pack brush cutter for heavy duty clearing requires a focus on specific performance and construction characteristics that separate professional-grade equipment from lighter-duty alternatives.
Essential Features for Demanding Tasks
Heavy-duty clearing places immense stress on a brush cutter. Therefore, the machine must be built from the ground up to withstand punishment. Key features to prioritize include a high-displacement engine (often above 40cc), a robust metal drive shaft capable of handling high torque without flexing or breaking, and a commercial-grade gearbox constructed from hardened metals. The gearbox, in particular, should have a solid reputation for durability, as it is a critical and expensive component to replace. Furthermore, the ability to utilize large, multi-toothed steel blades is non-negotiable; these blades are designed to slice through woody material up to several inches in diameter. A well-padded, adjustable harness is also an essential feature, not an accessory, for heavy-duty work, as it directly impacts control and safety when wielding a powerful tool with a sharp blade.
Power vs. Maneuverability: Finding the Balance
The quest for maximum power must be balanced with the practical need for maneuverability. A tremendously powerful engine is of little use if the machine is too heavy or cumbersome to control precisely in dense undergrowth. This is where the side pack design often shines. By shifting the engine's weight to the side, it creates a different balance point that many operators find easier to manipulate for detailed cutting patterns than a traditional straight-shaft model with a rear-mounted engine. The best models offer a synergy of power and balance, allowing the user to make precise cuts while maintaining enough horsepower to power through tough material without stalling. This balance minimizes operator fatigue, which is a significant factor in both productivity and safety during long clearing projects.
how to maintain a side pack brush cutter engine
Owning a powerful tool comes with the responsibility of proper maintenance. Regular, diligent upkeep is the single most important factor in ensuring the longevity, reliability, and safety of your equipment. Understanding how to maintain a side pack brush cutter engine will prevent costly repairs and ensure your machine is always ready for work.
Routine Maintenance Schedule
A strict maintenance schedule should be followed based on hours of use or a calendar basis, whichever comes first. For frequent users, a daily check is essential.
- Before Each Use: Check the engine for any signs of oil or fuel leaks. Inspect the air filter for dirt and debris; a clogged filter starves the engine of air, leading to poor performance and potential damage. Clean it if necessary. Check the fuel level and ensure the fuel mix is correct (for 2-stroke engines).
- After Each Use: Wipe down the entire machine to remove grass, sap, and dirt. This prevents corrosion and allows you to spot any damage or loose components.
- Every 25 Hours of Use (or Seasonally): This is a more thorough service interval. Replace the air filter and spark plug. Check the fuel filter inside the tank and replace it if clogged. Inspect the cooling fins on the engine to ensure they are free of debris for proper cooling.
- Every 50-100 Hours of Use (or Annually): Consider replacing the fuel lines, especially if they show signs of hardening or cracking. For 4-stroke engines, change the engine oil. Grease the gearbox at the end of the shaft according to the manufacturer's instructions.
Long-Term Storage Procedures
Proper preparation for off-season storage is critical to avoid starting problems when you need the tool again. Fuel left in the carburetor will degrade and form gums and varnishes that clog tiny jets and passages. The correct procedure is to either run the engine until the carburetor is completely out of fuel, or to drain all fuel from the tank and then run the engine until it stops. Once the fuel system is prepared, remove the spark plug and pour a small amount of high-quality engine oil into the cylinder. Slowly pull the starter cord a few times to distribute the oil on the cylinder walls, then reinstall the spark plug. This prevents internal corrosion. Store the brush cutter in a clean, dry place, preferably covered.
side pack vs backpack brush cutter differences
A common point of confusion arises when comparing similar-sounding designs. Understanding the side pack vs backpack brush cutter differences is crucial for selecting the right tool for your physical comfort and the job's requirements. While both are designed for professional-grade work, their ergonomics and application focus differ significantly.
Ergonomics and Weight Distribution
The primary difference lies in how the weight of the power unit is carried. A side pack brush cutter has its engine mounted directly onto the shaft assembly, with the weight resting against the operator's leg or hip, supported by a strap. In contrast, a backpack brush cutter features a separate engine unit that is worn on the operator's back via a backpack-style harness, connected to the cutting head by a flexible drive shaft. This fundamental difference dramatically alters the user experience. The backpack model distributes the engine's weight centrally across the back and shoulders, which can feel more balanced and place less strain on a single side of the body. This is often preferred for very large, heavy engines or for operators who need to work on steep or uneven terrain where balance is key. The side pack design offers a more direct connection to the tool, which some users prefer for its feel and responsiveness.
Ideal Use Case Scenarios
The choice between these two often comes down to the specific task and terrain.
| Factor | Side Pack Brush Cutter | Backpack Brush Cutter |
|---|---|---|
| Primary Use | Ideal for sustained use on relatively flat to moderately sloping terrain where maneuverability around obstacles is key. | Superior for extensive work on steep, rugged, or uneven terrain where overall balance and weight distribution are critical. |
| Operator Fatigue | Weight is carried on one side, which can lead to fatigue on that side of the body over very long periods. | Weight is evenly distributed across both shoulders and the back, generally reducing fatigue for all-day operations. |
| Maneuverability | Often perceived as more agile for precise cutting in tight spaces due to the unified design. | The separate power unit can make the cutting head feel lighter and easier to swing, but the backpack can be cumbersome in very thick brush. |
| Power Capacity | Typically houses medium to large engines. Very large engines can make the unit unwieldy. | Can accommodate the largest and most powerful engines available, as the weight is carried on the back. |
There is no outright "better" option; it is a matter of matching the tool's ergonomics to the job site and the operator's physical preferences.
safety tips for operating a brush cutter
A brush cutter is one of the most dangerous tools in landscaping and forestry. Its high-speed cutting attachment can throw debris at incredible velocities and cause severe injury in an instant. Adhering to a strict set of safety tips for operating a brush cutter is not optional—it is absolutely essential for protecting yourself and those around you.
Personal Protective Equipment (PPE)
Never operate a brush cutter without the full suite of recommended Personal Protective Equipment. This is your last line of defense against accidents.
- Eye Protection: Safety glasses are insufficient. You must wear a full-face shield or safety goggles to protect your eyes from flying rocks, metal fragments, and wood chips.
- Hearing Protection: Brush cutter engines operate at sound levels that can cause permanent hearing damage. Use high-quality earplugs or earmuffs.
- Leg Protection: Wear chainsaw chaps or pants made with cut-resistant materials like Kevlar. These are designed to bind the blade's drive mechanism upon contact, significantly reducing the severity of lacerations.
- Hand Protection: Sturdy, non-slip gloves improve grip and protect your hands from vibrations, thorny vegetation, and blisters.
- Foot Protection: Steel-toed boots with strong ankle support and deep tread are necessary for secure footing and protection from falling debris or the tool itself.
- Head Protection: A hard hat is advisable, especially when working under trees or in areas where falling branches are a possibility.
Safe Operating Procedures
Beyond PPE, safe operating techniques are vital. Always clear the work area of bystanders, especially children and pets, before starting. Be acutely aware of your surroundings, specifically hidden obstacles like rocks, stumps, fences, or wire that can cause the blade to kick back—a sudden and violent reaction that can throw the tool toward the operator. Always cut at full throttle to maintain blade speed and control. Never operate the tool above waist height, as this drastically reduces control and increases the risk of injury. Be mindful of your footing and always maintain a stable, balanced stance. Finally, never work alone; always have someone within calling distance in case of an emergency.
replacing line on a side pack trimmer head
While known for handling blades, many side pack brush cutters are also equipped with trimmer heads for lighter grass and weed maintenance. Knowing the process for replacing line on a side pack trimmer head is a fundamental skill that keeps your tool versatile and operational. The method can vary slightly depending on the head type, but the general principles remain consistent.
Types of Trimmer Heads and Their Mechanisms
There are several common types of trimmer heads, each with a different reloading method.
- Bump Feed Heads: The most common type. To advance fresh line, you gently tap ("bump") the head on the ground while the engine is running at high speed. This releases a pre-measured length of line from spools inside the head.
- Automatic Feed Heads: These heads automatically release more line when the engine RPM drops (indicating the line is too short), requiring no bumping. They are convenient but can sometimes be prone to tangling.
- Fixed Line Heads: These require the machine to be stopped completely to manually pull out more line. They are simple and reliable but less convenient.
For the bump feed head, which is most prevalent, the reloading process involves removing the head from the machine, loading new trimmer line onto an internal spool, and threading the ends through the eyelets on the head's housing.
Step-by-Step Replacement Guide
Here is a generalized guide for replacing line on a common bump-feed head. Always consult your specific model's manual first.
- Secure the Tool: Disconnect the spark plug wire to ensure the engine cannot accidentally start.
- Remove the Head: Most heads have a locking mechanism on the gearbox. Insert a compatible tool (like an Allen wrench) into the hole to lock the shaft, then unscrew the head (usually reverse-threaded, so turn clockwise to loosen).
- Disassemble the Head: Remove the spring and spool from the housing. Note how the old line is wound and how the spool seats in the housing.
- Wind New Line: Cut a length of the correct diameter and type of trimmer line. Feed one end through the anchor hole in the center of the spool. Wind the line tightly and evenly onto the spool in the direction indicated by the arrows on the spool. Leave a few inches unwound.
- Reassemble and Thread: Place the spool and spring back into the housing, ensuring they seat properly. Pull the loose ends of the line through the eyelets on the housing.
- Reattach the Head: Screw the head back onto the gearbox (remember, it's reverse-threaded). Reconnect the spark plug wire.
Using the correct line diameter is critical, as too thick a line can cause the head to overheat and fail, while too thin a line will wear out too quickly and provide insufficient cutting power.


