 English
 Español
Content
- 1 The Buying Decision – Model 541R vs. a Leading Competitor
- 2 Operation & Maintenance – Blade Installation and Carburetor Adjustment
- 3 Troubleshooting & Parts Acquisition
This comprehensive guide is your one-stop resource for everything related to the 541R brush cutter. Whether you're a potential buyer considering your options or an existing owner looking for maintenance tips, this article covers the essential information you need. We'll delve into a detailed product comparison, provide step-by-step installation instructions, offer a complete troubleshooting guide, and help you find the right parts for your machine. Our goal is to empower you with the knowledge to make an informed decision and ensure your equipment performs optimally for years to come.
The Buying Decision – Model 541R vs. a Leading Competitor
Choosing the right brush cutter is a critical decision that impacts your productivity and comfort. This section provides a head-to-head comparison of the Model 541R brush cutter against a leading competitor, helping you navigate the technical specifications and real-world performance differences. Our analysis focuses on key factors that professional users prioritize, ensuring you have all the facts before you invest in your next piece of equipment.
Core Comparison: Performance, Ergonomics, and Durability
When you're facing tough brush and demanding terrain, the right tool makes all the difference. The Model 541R brush cutter is engineered for high performance and professional-grade durability, but how does it stack up against another top-tier model? Let's break down the core components that define each machine's capabilities.
In terms of performance, the Model 541R brush cutter is celebrated for its powerful engine, designed to deliver consistent torque even under heavy load. Its engine displacement and power output are optimized for cutting through dense vegetation with minimal bogging down, making it a reliable choice for land clearing and demanding forestry tasks. The competitor, while also a strong performer, may offer a slightly different power curve, which could be more suitable for lighter tasks or for users who prioritize a specific type of engine response. The difference in horsepower ratings, though seemingly small on paper, can significantly affect how quickly and efficiently you can complete a job, especially when dealing with thick, woody growth.
Ergonomics is another major consideration for professionals who spend long hours operating their equipment. The Model 541R brush cutter features a meticulously designed handlebar system with an anti-vibration technology that drastically reduces the stress on your arms and hands. The balanced weight distribution minimizes fatigue, allowing you to work longer and more comfortably. The competitor model may have a different approach to its handle and harness design. Some users might find its harness system more intuitive, while others might prefer the weight balance of the 541R. The choice often comes down to personal preference and how the machine feels after an hour of continuous use. Both machines are designed to be comfortable, but the specific vibration dampening and weight distribution will determine which one is the better fit for your body type and work style.
Durability and reliability are non-negotiable for professional-grade tools. The Model 541R brush cutter is built with high-quality components and a robust engine casing that can withstand the rigors of commercial use. Its construction is solid, and user reviews frequently praise its ability to start reliably and operate flawlessly even after thousands of hours of service. Similarly, the competitor model also boasts a strong reputation for longevity. The main differences may lie in the material choice for specific components, such as the driveshaft or gear head. One model might have a more serviceable air filter system, while the other might offer a more durable carburetor design. The overall consensus is that both are excellent choices, but the specific needs of your operation—such as the frequency of use and the harshness of the environment—might sway your decision towards one over the other.
Finally, let's consider the aspects of price and support. The initial purchase price of the Model 541R brush cutter is a significant investment, but it reflects the quality and power of the machine. The competitor model may have a slightly different pricing strategy or be more widely available through different channels. The total cost of ownership goes beyond the price tag, however; you must also factor in the cost of spare parts, the availability of service centers, and the cost of routine maintenance. One machine might have a more extensive network of authorized service dealers, making repairs and parts acquisition easier and quicker. It is also important to consider warranty policies and what they cover. Some warranties may be more comprehensive than others, which can provide peace of mind in the event of a manufacturing defect.
Here is a detailed comparison table to help you visualize the differences:
| Feature | Model A | Model B |
| Engine Power | Designed for heavy-duty professional use. | Optimized for a balance of power and efficiency. |
| Vibration Dampening | Utilizes advanced anti-vibration technology. | Ergonomically designed to reduce operator fatigue. |
| Weight | Balanced for comfort during long working periods. | Engineered for a lightweight feel and easy maneuverability. |
| Driveshaft Type | Robust and durable for tough applications. | Highly reliable and designed for long-term use. |
Operation & Maintenance – Blade Installation and Carburetor Adjustment
Once you’ve acquired your powerful new brush cutter, understanding its operation and maintenance is key to unlocking its full potential and ensuring its longevity. This section provides detailed, step-by-step guidance on two of the most crucial maintenance tasks: installing the blade and adjusting the carburetor. Mastering these procedures will not only save you time and money on service calls but also give you confidence in your ability to keep your machine in top working condition. Safety and precision are paramount, so we’ll walk you through each process carefully, highlighting best practices and common pitfalls to avoid.
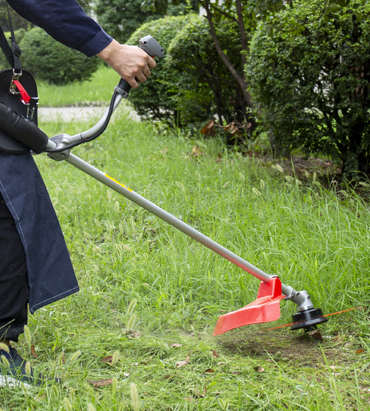
Model 541R brush cutter blade installation
Installing a new brush cutter blade or switching from a trimmer head is a fundamental task for any operator. While it may seem straightforward, doing it incorrectly can lead to blade instability, poor cutting performance, or, in the worst-case scenario, serious injury. This guide will ensure you perform the task safely and correctly every time. Before you begin, always make sure the engine is off and the spark plug wire is disconnected to prevent accidental starting. You will need a locking pin and a wrench provided with your machine. This process is designed to be simple, but attention to detail is crucial. The first step is to locate the hole on the gear head housing that aligns with the corresponding hole on the blade holder. Insert the locking pin through these holes to lock the shaft, which will prevent the blade holder from spinning while you work. Next, use the wrench to remove the retaining nut. Remember that this nut is reverse-threaded, meaning you will turn it clockwise to loosen it. This is a common point of confusion, so always double-check the direction. Once the nut is off, you can remove the old blade, the thrust washer, and the support flange. Take this opportunity to clean any debris from the shaft and surrounding area. To install the new blade, simply reverse the process. Place the support flange back on the shaft, followed by the new blade, and then the thrust washer. Ensure that the blade is properly seated on the support flange. Finally, thread the retaining nut back on by turning it counter-clockwise. Tighten it securely, but do not overtighten, as this can damage the components. After the nut is snug, pull out the locking pin and give the blade a gentle spin by hand to make sure it rotates freely and is centered properly. By following these steps, you can ensure your brush cutter is ready for action with a securely and safely mounted blade. Periodically check the blade and nut for tightness, especially after the first few hours of use, as vibrations can sometimes cause a slight loosening over time.
-
Preparation and Safety First
Before any work begins on the machine, the highest priority must be safety. Always turn off the engine and disconnect the spark plug wire to prevent any accidental ignition. Gather all the necessary tools beforehand, including the wrench and locking pin that typically come with the machine, as well as a pair of sturdy work gloves. Inspect the area around the brush cutter for any loose debris or obstacles that could cause a slip or trip hazard. It is essential to work on a stable, flat surface to maintain control and balance throughout the process. Do not rush this step; a few moments of preparation can prevent a serious accident.
-
The Step-by-Step Installation Process
The installation process is a methodical series of actions. The first step involves securing the blade holder. Locate the small hole on the gear head housing and align it with the corresponding hole on the blade holder. Once aligned, insert the provided locking pin through both holes. This action locks the shaft, which is crucial for the next step. Next, using the provided wrench, begin to loosen the retaining nut. A critical detail here is that the nut is reverse-threaded, so you must turn it clockwise to loosen it. This is counterintuitive for many people, so a mental note is helpful. After the nut is off, you can carefully remove the old blade and any accompanying washers or flanges. Now is a perfect time to inspect the components for any signs of wear or damage. To install the new blade, reverse the process. Place the new blade onto the support flange, ensuring it is correctly seated. Then, re-install the thrust washer and the retaining nut. Remember, turn the nut counter-clockwise to tighten it. Once it's hand-tight, use the wrench to secure it, making sure it is firm but not overly tight. Over-tightening can strip the threads or damage the gear head. Finally, remove the locking pin and confirm that the blade can spin freely by hand. A quick manual check for wobble or looseness is a good final confirmation of a secure installation.
-
Common Issues and Quick Fixes
Even with careful attention, issues can arise. One of the most common problems is the blade not spinning freely after installation. This usually means the retaining nut has been overtightened or the blade is not correctly seated on the flange. If you encounter this, simply loosen the nut and reposition the blade before re-tightening. Another issue is the blade feeling wobbly. This is almost always due to the blade not being fully seated or the retaining nut being loose. A proper check for tightness and a visual inspection for proper alignment are the best solutions. The reverse-threaded nut is another frequent source of error. Users mistakenly try to loosen it by turning it counter-clockwise, which only tightens it further. A quick reminder to turn it clockwise will solve this. It is also important to use the correct blade for your specific model; using an ill-fitting blade can cause vibration and a host of other problems. Regularly cleaning debris from the gear head area will also help prevent issues with proper blade seating and rotation.
Model 541R carburetor adjustment
The carburetor is the heart of your brush cutter's fuel system, and a properly tuned one is essential for optimal performance. Over time, factors like fuel quality and changes in elevation can affect its settings, leading to issues like poor acceleration, rough idling, or difficulty starting. This guide will walk you through the basics of carburetor adjustment, empowering you to fine-tune your machine for peak efficiency. We'll explain the purpose of the adjustment screws and provide a simple procedure for making minor tweaks. Before attempting any adjustments, ensure your machine is in good working order, with clean fuel and a properly functioning air filter. Carburetor tuning should be done with care and patience, as small changes can have a significant impact on performance. The primary goal is to achieve a smooth idle and a strong, consistent power delivery at high RPMs. You will typically find three adjustment screws on your carburetor: the high-speed (H), low-speed (L), and idle speed (T) screws. The 'T' screw is for setting the idle RPM. The 'L' screw controls the fuel-air mixture at idle and low-throttle speeds, while the 'H' screw controls the mixture at full throttle. We’ll start by adjusting the idle, as it’s the easiest to set and provides a good foundation for the other adjustments. With the engine running and warm, turn the 'T' screw clockwise to increase the idle speed or counter-clockwise to decrease it. Adjust it until the engine runs smoothly without the clutch engaging. Next, you can fine-tune the low-speed mixture. Start with the 'L' screw turned out 1-2 full rotations from a lightly seated position. With the engine running, slowly turn the 'L' screw clockwise until the engine's RPM increases, then back it off until it runs smoothly. Finally, the high-speed mixture can be adjusted for maximum power. This is best done under load. After these adjustments, you will notice a significant improvement in the machine's responsiveness and overall power. Remember to always consult your machine's manual for specific instructions and recommended settings, and never force the adjustment screws.
-
The Purpose and Principles of Adjustment
A carburetor's main function is to mix air and fuel in the correct ratio for combustion. This ratio must be precise for the engine to run efficiently. The purpose of adjusting the carburetor is to compensate for variables like altitude, temperature, humidity, and even the type of fuel used, all of which can affect this critical ratio. When the air-fuel mixture is too rich (too much fuel), the engine may produce excessive smoke, run poorly, and foul the spark plug. When it's too lean (too much air), the engine can overheat and cause internal damage. The adjustment screws give you the ability to fine-tune this mixture. The low-speed (L) screw controls the fuel delivery at idle and during the initial throttle response. The high-speed (H) screw governs the fuel mixture at full throttle. The idle speed (T) screw simply sets the engine's revolutions per minute (RPM) when the throttle is released. Understanding these basic principles is the first step toward effective tuning, ensuring you can diagnose a problem and make the correct adjustment to rectify it without causing further issues. It's about finding that "sweet spot" where the engine idles smoothly, accelerates cleanly, and delivers maximum power without strain.
-
A Simple Step-by-Step Procedure
Start with a warm engine. A cold engine will not give an accurate representation of the proper settings. For safety, ensure you have a screwdriver ready and are working in a well-ventilated area. First, identify the three screws: 'L' for low, 'H' for high, and 'T' for idle. The 'T' screw is usually set first. While the engine is idling, turn the 'T' screw slowly clockwise until the cutting attachment begins to engage, then back it off a quarter turn. This ensures the blade or string head does not spin at idle. Next, move to the low-speed 'L' screw. Begin by turning it slowly clockwise until the engine starts to run rough, indicating a lean mixture. Then, turn it slowly counter-clockwise until the engine runs smoothly. You may need to fine-tune this to get the best acceleration. The final step is adjusting the high-speed 'H' screw. This is best done under a light load, like cutting a patch of grass. Turn the 'H' screw slowly clockwise until the engine begins to bog down, then turn it slowly counter-clockwise until the engine reaches a high, consistent RPM without an unhealthy, high-pitched whine. Do not over-rev the engine. The goal is a steady, strong sound. After all adjustments, let the engine idle and check for smooth operation. You may have to make a few passes to find the perfect balance, as each screw can affect the others slightly. Patience is key to a perfectly tuned machine.
-
Warning and Professional Guidance
While carburetor adjustment can be a straightforward process for the average user, it is not without risk. Improperly adjusted carburetors can lead to significant engine damage. A mixture that is too lean (too much air, not enough fuel) can cause the engine to overheat, leading to a scored piston and cylinder. This is a common and often irreversible problem that can require a full engine rebuild. A mixture that is too rich (too much fuel) can cause carbon buildup and lead to poor performance, fouled spark plugs, and excessive fuel consumption. If you are not confident in your ability to perform these adjustments, or if the engine symptoms do not improve after careful tuning, it is highly recommended that you take the machine to an authorized service center. Professional technicians have the tools and experience to diagnose more complex issues, such as a clogged fuel filter or a faulty diaphragm, and can make precise adjustments with a tachometer to ensure the engine is running within its specified RPM range. Never attempt to remove or tamper with the carburetor beyond the three main adjustment screws unless you have the proper training and tools. Your machine is a powerful piece of equipment, and treating it with respect and caution is the best way to ensure its longevity and your safety.
Troubleshooting & Parts Acquisition
Even the most reliable brush cutters can occasionally encounter issues. Knowing how to diagnose and address common problems can save you from unnecessary downtime and expensive repair bills. This section provides a comprehensive 541R brush cutter troubleshooting guide to help you get your machine back in working order. We’ll also give you the essential information you need to find and acquire the right parts to keep your tool running like new, focusing on the importance of quality and proper sourcing.
541R brush cutter troubleshooting
When your brush cutter isn't operating as it should, the problem can often be traced back to a few common culprits. Before you panic, a systematic approach to diagnosis can quickly pinpoint the issue and lead you to the right solution. The most frequent complaint is that the machine will not start. If this is the case, start by checking the fuel. Is the tank full? Is the fuel fresh? Old, stale fuel can degrade and cause starting issues. If the fuel is good, move on to the spark plug. Remove the plug, inspect it for cleanliness, and check the gap. A dirty or improperly gapped plug can prevent the engine from firing. Also, check that the spark plug wire is securely connected. Another starting issue could be a flooded engine. If you've pulled the starter cord too many times without the engine catching, you may have pushed too much fuel into the cylinder. In this case, try holding the throttle wide open while pulling the starter cord a few times to clear the excess fuel. If your machine starts but then stalls, or if the idle is rough, the issue may be related to the air-fuel mixture or the air filter. A dirty air filter can restrict airflow, causing the engine to run rich and stall. A clean filter is critical for a healthy engine. If the idle is still rough after cleaning the filter, refer back to the carburetor adjustment section to make minor tweaks. Poor performance under load, such as a loss of power or the engine bogging down, can also be a sign of a clogged fuel filter. This tiny filter, located inside the fuel tank, can become clogged with debris, starving the engine of fuel. Replacing it is a simple and inexpensive solution that can restore full power. Finally, if you notice the machine is running hot, which can be identified by the smell of burning oil or an unusually hot engine casing, the cooling fins may be clogged with debris. Always keep the cooling fins clean to ensure proper airflow and prevent engine damage. By following these simple steps, you can troubleshoot and fix many common issues, keeping your machine running at its best.
-
When Your Brush Cutter Won't Start
A non-starting engine is a frustrating but common issue that can often be resolved with a few simple checks. First, verify the fuel. Make sure the fuel tank contains a fresh, properly mixed batch of gas. Old fuel can separate and lose its flammability. If the fuel is old, drain the tank and replace it with fresh fuel. Next, check the spark plug. A fouled or wet spark plug indicates a potential issue with the air-fuel mixture. Clean the plug with a wire brush or replace it entirely if it's in poor condition. Also, confirm the gap on the spark plug is correct. Another culprit is a flooded engine, which happens when the choke is left on for too long or the engine is over-primed. If you suspect a flooded engine, remove the spark plug and pull the starter rope a few times to clear the excess fuel from the cylinder. Before replacing the plug, allow the cylinder to air out for a few minutes. Finally, check that the kill switch is not in the 'off' position. It sounds simple, but it is a common mistake. Ensuring that these basic systems are in working order will solve most starting problems.
-
Resolving Unstable RPMs and Power Loss
An engine that runs inconsistently or lacks power under load can be a sign of a variety of issues. The most likely cause is a problem with the fuel delivery or the air filter. First, inspect the air filter. A dirty or clogged air filter restricts airflow, forcing the engine to run rich, which leads to poor performance and black smoke. Clean or replace the air filter as needed. Next, consider the fuel filter. Located at the end of a fuel line inside the fuel tank, this small filter can become clogged with sediment and debris, starving the engine of fuel. A simple replacement of the fuel filter can restore full power. Another possibility is a clogged spark arrestor screen in the muffler. Over time, carbon buildup can block this screen, creating back pressure and causing a loss of power. Carefully remove and clean the screen. Lastly, if these checks don't resolve the issue, the carburetor may be out of adjustment. Refer to our carburetor adjustment guide to fine-tune the low and high-speed screws to achieve optimal performance.
-
Addressing Overheating Issues
Overheating is a serious condition that can cause irreversible engine damage. If your brush cutter feels unusually hot to the touch or smells like it is burning, stop working immediately. The most common cause of overheating is a blocked cooling system. The engine's cylinder is surrounded by cooling fins, and it is essential that these fins remain clean and free of debris. Debris such as grass, dirt, and leaves can accumulate in the cooling fins, preventing proper airflow and causing the engine to retain heat. Use a brush or compressed air to thoroughly clean all the cooling fins on the cylinder head and starter casing. Another potential cause is an incorrect air-fuel mixture. An overly lean mixture, with too much air and not enough fuel, can cause the engine to run hotter than normal. If you've been working at high altitude, you may need to adjust your carburetor's high-speed screw to compensate. Lastly, a poorly lubricated engine can also overheat. Ensure you are using the correct oil-to-gasoline mix ratio as specified in your owner's manual. Addressing these issues promptly is crucial for the long-term health of your machine.

Model 541R parts diagram and Acquisition Guide
Maintaining the performance and safety of your brush cutter requires using the correct parts. This section is designed to help you navigate the process of finding and acquiring the right components. From understanding the importance of using high-quality parts to knowing how to read a Model 541R parts diagram, this guide will give you the knowledge you need to keep your machine in top condition. We'll also provide tips on how to identify the specific part numbers and recommend the best ways to source them, ensuring you get a reliable component that fits perfectly and performs as it should. Your machine is an investment, and using the right parts is the best way to protect that investment and ensure its longevity.
-
The Importance of Quality Parts
When it comes to maintaining a high-performance brush cutter, the quality of the replacement parts cannot be overstated. Using sub-standard or generic parts can lead to a host of problems. For example, a poorly manufactured carburetor can result in inconsistent fuel delivery, leading to poor engine performance and potential damage. Similarly, a low-quality spark plug may not fire properly, causing starting issues and a rough idle. Even seemingly minor components like a fuel filter or a gasket can cause major issues if they fail prematurely. High-quality, specially designed components are built to the exact specifications of your machine, ensuring a perfect fit and reliable operation. They are manufactured from durable materials that are designed to withstand the heat, vibration, and stress that a brush cutter undergoes during use. While generic parts may be cheaper, the long-term costs of a broken-down machine or an expensive repair can far outweigh any initial savings. Investing in the right components is a smart decision that ensures your machine runs at its best and minimizes the risk of unexpected failures in the field.
-
How to Find the Right Parts with a Model 541R parts diagram
A Model 541R parts diagram is an invaluable tool for any owner. This detailed schematic breaks down the machine into its individual components, each with a corresponding part number. Using this diagram is the most accurate way to ensure you are ordering the correct part. To find the right diagram, you can use the model number of your machine. Once you have the diagram, locate the specific component you need to replace. For instance, if you need a new air filter, you would find the air filter assembly on the diagram and then look up the associated part number in the accompanying list. This method eliminates guesswork and reduces the risk of ordering the wrong part. Many diagrams also show how the parts fit together, which can be a helpful visual guide for assembly and disassembly. If you are unsure about a part number, it is always a good idea to cross-reference it with the part description or consult with a service technician. Being able to read and utilize a parts diagram is a skill that will save you time and frustration, and it is a key part of effective long-term maintenance for your brush cutter.
-
Recommended Sourcing Channels for Reliable Parts
Once you have identified the correct part number, it's time to find a reliable source to purchase it. While many online retailers offer a wide range of replacement parts, it is crucial to buy from a trusted vendor to ensure you receive a genuine, high-quality component. Reputable suppliers often provide detailed product descriptions and clear return policies. If you are uncertain about the part, it may be best to purchase directly from a manufacturer-approved dealer. These dealers have access to a full inventory of genuine parts and can also provide expert advice and technical support. They can also verify that the part number you have is correct for your specific model and serial number. Purchasing from a reliable source also gives you confidence that the part is brand new and has not been used or refurbished. For more common parts, such as spark plugs or air filters, there are many excellent online options that specialize in power equipment. For more complex or critical components like a carburetor or gear head, it is highly recommended to seek out a parts supplier with a strong reputation for authenticity. Your machine's performance and safety depend on it.


